 DS Development News
- Version 4 of Bells and Whistles for Outlook
- Weight Diet for Outlook
- Using Outlook Connectors
- Email read and delivery confirmations
- Auto Follow Up v1.0
- Easy Mail Merge v1.1.95
- Send Email Limit for SMTP Mail Servers - The Basics
- Best practices for effective email marketing
- How to Manage or Remove Outlook Add-ins
- Auto Reply Manager - Update 2.0.80
11
A walkthrough to the new Bells&Whistles email profiles features
No comments · Posted by Bogdan in Outlook Add-ins
Tags: Email & Outlook · email profiles · productivity add-in · type of email
– advanced customizations for better email productivity –
About two weeks ago we launched the newest version of our award-winning Outlook add-in, Bells&Whistles. As always, we strive to bring our users the best email experience possible, so version 4 features even more customization options than before, a more complete user experience with the help of various types of email profiles and better integration in Outlook.
Since both its interface and the behavior system are quite different from the previous version, we received quite a number of emails from customers inquiring about the types of email profiles in Bells&Whistles, the different customization options and the Message recipient pop-up window (in which we take great pride – you’ll soon see why!). Bells&Whistles can now apply all customization options (specific greetings, signatures, tracking IDs, attachment handling etc.) for each type of email action users can perform in Outlook. There are basically three types of email actions available: composing a NEW message, REPLYing to one and FORWARDing. For each combination of the three, users can define an email profile with different settings.
I feel that it would be better to explain in greater detail just how Bells&Whistles handles the different email profiles and types of emails each user defines, how it actually works when compared to the last version and provide both our new and our existing users with a couple of useful tips. 🙂
*Please note that the following article on types of email profiles is provided using the Outlook 2010 interface, but Bells&Whistles works on almost all versions of Outlook (2000 and up) – the only difference is the placement of some buttons, that’s all!*
Create email profiles for each type of situation
After you install Bells&Whistles for Outlook, you will be presented with a new ribbon in which you can access all its functions:

Upon entering the Options screen, all the customizable fields are grouped by type.
Tip: if you press the blue question mark at the right a short description of what that group of features does will appear.
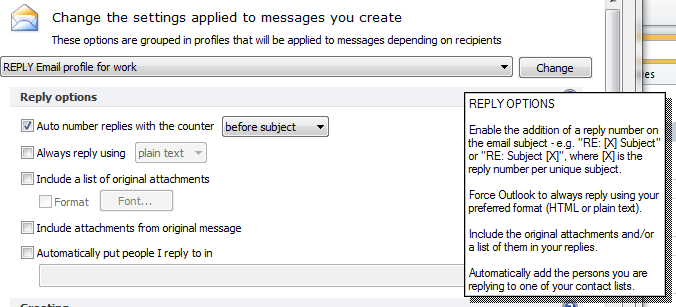
At the top, you can see the default, predefined email profile’s name – what this means is that whatever you customize in this screen will be added to the Everyone email profile and also, because it is defined for all NEW, REPLY and FORWARD types of emails, the options you checked will be applied to all types of email actions. This is different from v3 of Bells&Whistles, where you could only set up specific Send Rules, thus customizing only a couple of the features our product was able to do.
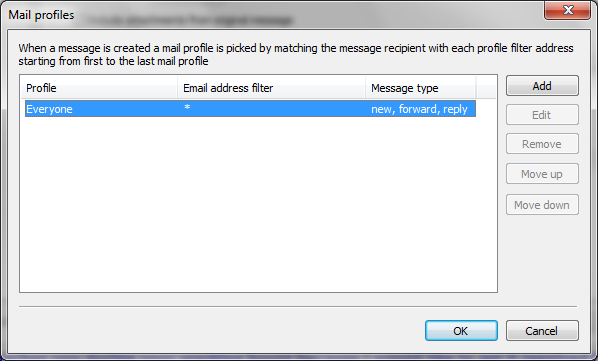
In the Change email profile screen you will be able to define other types of email profiles, such as “Reply to coworkers”, “New/Forward message to family” and so on easily, by clicking on ADD, then selecting to which type of emails the profile will be applied to (new ones or cases where you reply and/or forward a message).
As in v3, you can configure email profiles based on your recipients’ addresses and create as many as you’d like. For example, I’m going to create the above two examples:
#1. A type of email profile for replying to coworkers;
#2. A type of email profile for new/forwarded messages to my family.
For no.1 I click on Add and give it a name – e.g. “REPLY Email profile for work”. Because we all have our addresses in the format user@emailaddressmanager.com, I will enter *@emailaddressmanager.com, then uncheck the boxes next to New and Forward and click OK.
When I return to the Options screen I will see the name of my newly-created email profile at the top and almost all features will be unchecked. I can now start entering a specific signature, disclaimer notice, greeting and so on.
Tip: it’s really a good idea to have an email profile for coworkers (especially if you work in a smaller office) – e.g.: your signature should be a shorter one, without images (so no time is lost uploading/downloading the same image dozens of times/day) and include just the “basics”. You can find out how to compose a good one here.
Now, to configure the second email profile I will do the same as before: give it a name (“NEW/FW Email profile for family” for example), add my family’s addresses and this time, uncheck the Reply option. Again, when returning to the Options screen the newly created email profile will be selected in the top portion of the screen and I can start customizing it.
So, I have 3 email profiles defined:
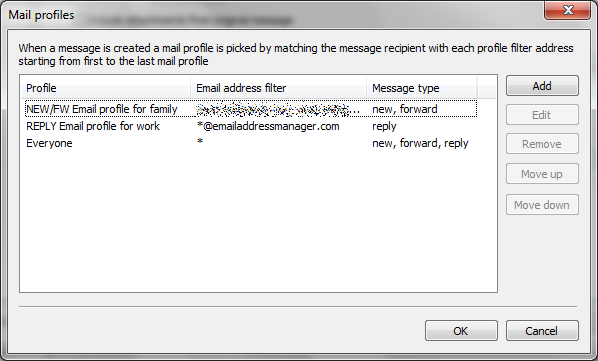
Tip: the closer to the top a profile is, the higher its priority. So, if I have 2 email profiles that apply to an email, the one closer to the top will always be inserted – you can thus create very complex rules and behaviors.
Here’s how Bells&Whistles‘ email profiles work:
When I receive an email from a coworker and click on reply, Bells&Whistles scans the TO field – because it has a profile for reply types of emails to that domain, my “REPLY Email profile for work” kicks in: in the message window I will see my “short” signature.
Now, here’s the interesting part: when I want to compose a new email to my family, Bells&Whistles would also have to scan the TO field – the problem is that it’s empty when the new message window pops-up! Thus, it cannot apply any email profile – also, a continuous scan of the TO field until I would write an address is not a viable option (because, for example, some may compose the message first and then enter a recipient – when Bells&Whistles would insert the email profile’s customizations it would ruin the formatting). Because of this shortcoming we had to create that Message Recipient pop-up window. It’s the same when you want to forward a message, since the TO field is also empty.
For example, when I start composing a new message to my family the pop-up window comes up. I write an address, Bells&Whistles recognizes it and brings it up from my contacts folder. After I click OK the pop-up window transmits the data to our add-ins’ email profile engine which sees that it can apply one of its defined profiles for NEW types of emails and sends the appropriate texts to the message window, which are then inserted and displayed.
Tip: when the pop-up window appears, just write the first few letters of your recipient’s address – Bells&Whistles will autocomplete the rest. Then, just press Enter two times – once to select the address and once to confirm and close the window.
You can choose to disable the pop-up window, but you will miss out on many of the customization options for the new and forward types of emails. This is because Bells&Whistles now uses different email profiles for all kinds of situations, rather than a “default profile” which is added to each and every scenario. This provides for a much more flexible and user-friendly tool, allowing users to define as many profiles as they like based on specific types of emails and the filtering options present in the Email Profile window.
In conclusion, I hope this explains it a little better and that you’ll try out the new email profile feature of Bells&Whistles, along with all the other great options it has to offer! Please feel free to post your questions or suggestions here, on our forum or send them to support@emailaddressmanager.com.
If you have ever sent out an email newsletter, I’m sure that with each passing campaign you encountered people who opted out of your email list. Have you ever asked yourself why? Read more: Why do people unsubscribe to emails? | 1 Comment
The subject line in an email, almost as much as the from line, is one of the most important deal-breakers for your readers. That’s why this week we looked at how different email clients (on all platforms we could get our hands on) dealt with them… So, continue reading and see for yourself how many characters your subject line should have! Read more: The maximum displayed length of the email subject line | 1 Comment
In last week’s article, we hoped to convince you that the from line is at least as important as the subject line in all your email communications. Now, to help you out, we tested different platforms and came up with the following “cheat-sheet”, detailing the maximum displayed length of the from line on different browsers, phones and desktop applications! Read more: The maximum displayed length of the email from line | 2 Comments