 DS Development News
- Version 4 of Bells and Whistles for Outlook
- Weight Diet for Outlook
- Using Outlook Connectors
- Email read and delivery confirmations
- Auto Follow Up v1.0
- Easy Mail Merge v1.1.95
- Send Email Limit for SMTP Mail Servers - The Basics
- Best practices for effective email marketing
- How to Manage or Remove Outlook Add-ins
- Auto Reply Manager - Update 2.0.80
15
Use an email signature creator for that great look you’ve been looking for!
No comments · Posted by Bogdan in Email & Outlook
Tags: create signature · email signature · how to email · signature creator
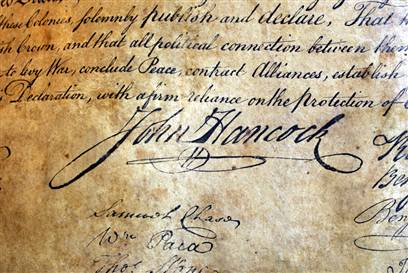
If you’re like me, you want to present yourself well to all persons you come in contact with – whether that contact is face to face or over the Internet. Usually, we don’t consider emails as more than a tool for communication, but if you start to think about it, emails can help create and define the image we have about a person – who they are, how they behave. This isn’t restricted just to the people we haven’t met in real life, so I believe that creating a great looking email will strongly tip the balance in your favor. A thought-out email implies authority, professionalism, something usually reflected in the creation of the signature. It’s the same as John Hancock’s signature on the Declaration of Independence – you remember it both because of the self-confidence it conveyed and its aesthetics, right? So why not apply that same train of thought and use a signature creator for your emails?
While researching this article’s idea, I came across quite a number of signature creators on the web, standalone programs with varying prices. This actually baffled me, since I’ve always thought that designing is the difficult part, putting it into practice being only a second thought. Also, the need of a separate signature creator is something I’ve never considered and don’t find very practical.
Now, if you want some great tips on signature creation, what fonts to use and how it should look then just consult these past articles:
The DOs & DON’Ts of Email signatures
The best email fonts are the ones already included in Outlook! – the tips here can be used upon launching your signature creator, even if the article deals with a more general topic
I won’t repeat what’s already been said, and I’m sure that after zapping through the above links you’ll be able to design something great, this week I just want to present an unsung hero, the signature creator found in Bells&Whistles. For those who don’t know, Bells&Whistles for Outlook is a feature packed add-in for Outlook which provides more than 40 helpful tweaks for your daily email routine, one of which being a signature manager.
Not only can you attach hyperlinks and images, you can also define specific layouts and alignments in Bells&Whistles’ signature creator, all from this simple, user friendly screen:
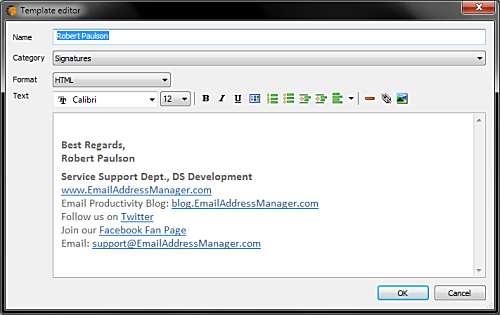
Additionally, you can also insert a horizontal line (to better differentiate emails in a conversation), choose different fonts, sizes, colors and so on. One great thing about this signature creator is that it allows you to have an HTML signature, with hyperlinks, colors, images etc. and another signature for the cases when you are replying to a plain text email. We all know that the layout can get a bit jumbled upon transition, so we have added this feature at the request of our customers for quite some time.
My favorite thing about this signature creator is that it works alongside the rules defined in Bells&Whistles, so you can have a particular signature for your office emails, one for your friends, one for family and so on. You know how weird it feels when you receive an email from a close friend that ends with his business signature (detailing name of the company and position, slogan, web address, alternate email and so on)? Well, no more! Now you can have specific greetings, fonts, signatures, attachment behaviors and many, many more with the help of Bells&Whistles. Why not give it a try?
Just download the trial version from here (all features are present and working), or just purchase a full license from here and never copy/paste your signatures again! The full version costs just 29.95$ (30-day money back guarantee), and with it you manage all your future communications effortlessly forever!
Now, here’s a tip! You don’t have to use standalone signature creators if you want to add a “special something” to your emails. If you want to insert an image that displays your actual signature, just follow these easy steps:
1.Write your signature on a white piece of paper with a thick pen
2.Scan it
3.Download and install a free photo viewer named IrfanView
4.Open your signature image file and press Shift+G
5.Increase the contrast and decrease the gamma value until you’re left with a great looking signature on a pure white background.
It’s easy and you don’t need to use 3rd party standalone signature creators to do it! Additionally, just press Ctrl+R and resize the image until you’re happy with the result, then save it as either a PNG or JPG file.
If you have ever sent out an email newsletter, I’m sure that with each passing campaign you encountered people who opted out of your email list. Have you ever asked yourself why? Read more: Why do people unsubscribe to emails? | 1 Comment
The subject line in an email, almost as much as the from line, is one of the most important deal-breakers for your readers. That’s why this week we looked at how different email clients (on all platforms we could get our hands on) dealt with them… So, continue reading and see for yourself how many characters your subject line should have! Read more: The maximum displayed length of the email subject line | 1 Comment
In last week’s article, we hoped to convince you that the from line is at least as important as the subject line in all your email communications. Now, to help you out, we tested different platforms and came up with the following “cheat-sheet”, detailing the maximum displayed length of the from line on different browsers, phones and desktop applications! Read more: The maximum displayed length of the email from line | 2 Comments
No comments yet.
<< Quick guide to protecting yourself from email hoaxes and scams