7
How to manage bounced email addresses lists from Outlook
2 Comments · Posted by Bogdan in Email & Outlook
Tags: bounced email addresses list · discount · Email & Outlook · Email Address Collector & Quick List
*This week we will answer another frequently posted question (both from users of our products and general Outlook users) with a short tutorial on how to search for bounced email addresses and erase them from your email addresses list.*
*In the following tutorial we will benefit from two of our top-selling products in order to achieve this task, but we have a surprise for you! You will not have to purchase both of them, for a limited time only for every purchase of Email Address Collector we will give away one free license of QuickList. Read on to find out how or just scroll to the bottom of this post for the instructions.*
I think the fact that lists of email addresses have grown to unbelievable sizes in the last couple of years, with blogs, newsletters, social media and all the other wonderful things Web 2.0 brought to the table is a self-evident truth. Usual email addresses lists range from dozens to hundreds of thousands of entries (and even millions if you are a business with a large client base and many affiliates), and are beginning to overwhelm any user. Since there seems to be a growing interest about this topic we will concentrate this week on how to create a list of “bounced” email addresses and erase them from your global email addresses list.
What are “bounced” email addresses?
The “bounce-back” is a general term describing the action where user A sends a message to user B’s address (userB@example.com) and sometime later receives an error notification saying that the email message could not be delivered. This can happen for a number of reasons, when users cancel their subscriptions to the email provider, if the email addresses are spelled incorrectly (and thus, non-existent), if the email account holder exceeded his mailbox size quota etc. If your client base consists of a list of email addresses with hundreds of thousands of entries, then inevitably, you will receive a large number of bounce-backs. Why not use that time and bandwidth, which is basically wasted, for other things? This downtime affects in different proportions both large and small companies as well as business and normal users, regardless of each ones’ email address list size.
Removing “bounced-back” email addresses lists – Step 1
Even if Microsoft Outlook gives users the possibility of extracting and creating email addresses lists from contacts, it lacks any further filtering abilities, as well as the one we are looking for – extracting email addresses from the body of the message. This is where Email Address Collector comes in, our product that lets users filter messages and build an email addresses list with ease.
Normally, you will receive the bounce-back messages in your Inbox. If you haven’t already, I strongly suggest creating a rule in Outlook so that all messages received from MAILER-DAEMONs, postmasters and so on will be automatically moved to a specific folder. You can accomplish this easily by creating a “bounced” email addresses folder in Outlook, then going to the Rules screen and selecting “New Rule”.
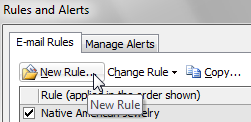
The type of the new rule should be the one that moves messages from someone to a folder:

In the next screen check the box next to “with specific words in the sender’s address” and define MAIL-DAEMON, postmaster and any of the other generic names of these programs you encounter:
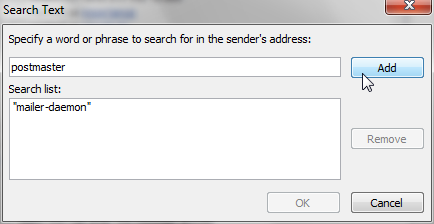
Then, choose to move those messages to the previously created “bounced” folder and click on Finish.
Go to your Inbox, select to apply the newly created rule to it and you’re on your way to updating your email addresses list!
Removing “bounced-back” email addresses lists – Step 2
Launch Email Address Collector and select Microsoft Outlook from the bottom left menu. You will be presented with a window such as this:
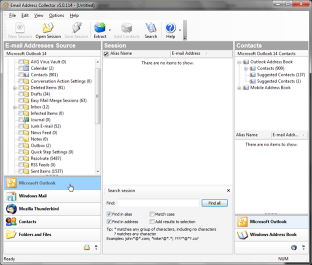
Go to the “bounced” folder you just created, check it and right click on it:
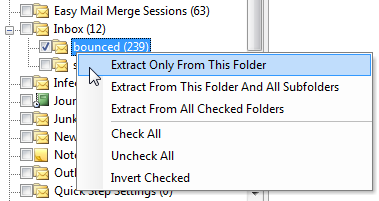
*Of course, if you want to micro-manage your bounced email addresses lists, you can create rules for MAILER DAEMONs, for postmasters and so on, in which case just select the appropriate folders and click on “Extract email addresses from all checked folders”.*
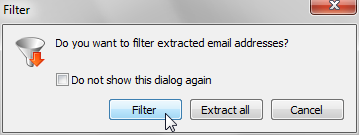
In the next screen, select to filter the messages so that your bounced email addresses list will be populated with only the important entries (and not with the postmasters’ ones, for example).
Removing “bounced-back” email addresses lists – Step 3
In the newly-opened window go to the second tab (the one labeled “Messages”) and choose to build your email addresses list from only the ones found in the bodies of the messages:
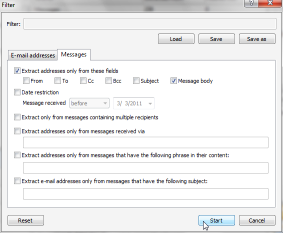
It’s best to leave a wide margin of error, but if you would like to filter even further, you can define specific subject lines (the most frequently used one in my “bounced” folder is “failure notice”, for example) and create specific email addresses lists for each occurrence.
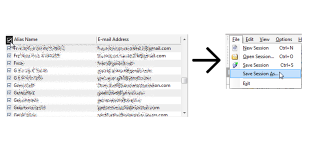
So, now, just select all of the entries Email Address Collector found and save them in the CSV file format.
Tip: If you don’t already have a global email addresses list made, you should:
- In Email Address Collector, check all folders in which you receive messages as well as the “Sent” folders;
- Choose to “Extract all” -> Save As CSV file type – don’t worry, Email Address Collector will automatically erase duplicate entries and leave you with a “clean” email addresses list;
*In this case, when creating your bounced email addresses list, check the option to extract addresses from the “From” field as well (so when you erase the bounced list, the postmasters and mailer daemons will be taken out also).*
Removing “bounced-back” email addresses lists – Step 4
Now that you have your bounced email addresses list saved conveniently on your hard-drive, you will have to extract it from your global one. In order to do this you will have to launch QuickList, our product which deals with intersecting, merging and deduping large email addresses lists with ease.
So, after launching it, you will see that the area named “Source A” is selected, which means that the email addresses list you import will be loaded into it. Click on the icon that displays a box and select to import “From a CSV file”.
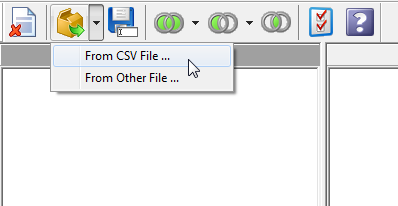
Browse to your global email addresses list file and double click on it – you will then see that all of the aliases and addresses of your contacts will be loaded in that area. Afterwards, click on Source B and browse to your newly-created “bounced-back” email addresses list and load it.
The procedure which we will now use is named a “dedupe”. This basically means that the entries Source A and Source B have in common will be deleted from Source A (which is exactly what we are looking for). This is also easily accessible from the self-explaining icon:
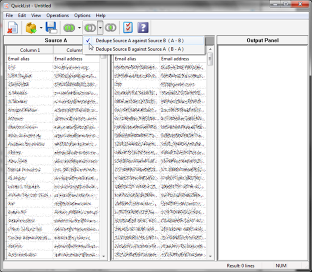
Just click on that button and… you’re DONE! You now have an updated email addresses list that contains only contacts which will receive your messages. No more bounce-backs and wasted time or bandwidth!
Now, just click on the Output Panel (so it is selected) and save your new email addresses list as a CSV file.
I know that this may seem complex or time-consuming, but both Email Address Collector and QuickList are built “for speed”, so extracting from thousands of messages, saving them as email address lists and deduping afterwards only takes a couple of seconds.
Also, there is no limit to the amount of data processed or to how many times you perform these procedures, so you can update your mailing lists anytime.
*As a special offer to all our blog visitors, for a limited time only, we offer a free license for QuickList for all purchases of Email Address Collector. Normally, they would cost $49.9 when bought separately, if purchased as a pack they would still be $39.95. This way, all our users will be able to update and manage their email addresses lists with ease by paying only for Email Address Collector.
In order for you to benefit from this offer, purchase a license for Email Address Collector and send an email with your OrderID number to this address: support@emailaddressmanager.com. You will be contacted by our support team with the needed instructions shortly afterwards.
Please note that this offer is available only for purchases of Email Address Collector between the 7th of March and the 13th of March, 2011. *
If you have ever sent out an email newsletter, I’m sure that with each passing campaign you encountered people who opted out of your email list. Have you ever asked yourself why? Read more: Why do people unsubscribe to emails? | 1 Comment
The subject line in an email, almost as much as the from line, is one of the most important deal-breakers for your readers. That’s why this week we looked at how different email clients (on all platforms we could get our hands on) dealt with them… So, continue reading and see for yourself how many characters your subject line should have! Read more: The maximum displayed length of the email subject line | 1 Comment
In last week’s article, we hoped to convince you that the from line is at least as important as the subject line in all your email communications. Now, to help you out, we tested different platforms and came up with the following “cheat-sheet”, detailing the maximum displayed length of the from line on different browsers, phones and desktop applications! Read more: The maximum displayed length of the email from line | 2 Comments
2 comments
<< How to add an attachment to a mail merge email in Outlook

Carell · March 8, 2011 at 5:35 pm
Thanks for a real solution, got it working on the second try, I missed a step, my bad. Also I’ve just purchased your Email Collector and now waiting for the free license of Quick List. Glad I got here just in time.
Thank you!
What are some solutions to scrubbing bad email addresses out of your database? · August 23, 2013 at 6:59 am
[…] and remove all the bad addresses, which will at least keep the disease from spreading any more. =P HERE is a great tutorial on how to do it. They reference their email scrubbing software for the part of […]